Create a simple Markdown-based blog in Node.js
This post is about the process of creating a simple Markdown blog in Node.js.

Intro
A year ago, I wrote a short post about the same subject: Markdown blog with EJS.
This year's post brings a lot of improvements.
First of all the stack has completely changed. We'll be using modern modules (Hono, Hono Node-Server, Eta and Marked) instead of old and aging ones (Express, EJS, Gray-Matter and Markdown-It). The benefit of this stack compared to the previous one is that we're using only 4 modules instead of 90 and the bundle size gets divided 12 times, from 862KB to 71KB!
The content is organized in a better way, where each step is thoroughly explained, allowing the reader to easily understand the process.
The code is written asynchronously, uses import statements instead of require and is split into reusable blocks to be maintainable.
What is Markdown good for?
When a browser displays some content, it's rendering the HTML structure of a webpage along with its styles and scripts.
HTML is the Web's core markup language.
Developers use HTML to define elements, combine them and produce a document.
A document begins with <!DOCTYPE html> followed by the <html> element which includes a <head> and a <body>.
Each one of the last two elements contains other elements working together, like a painting, so we can see the whole picture.
Let's take a look at a basic HTML document:
<!DOCTYPE html>
<html lang="en">
    <head>
        <!-- The title that appears in a browser's tab -->
        <title>My webpage title</title>
    </head>
    <body>
        <!-- An H1 heading -->
        <h1>My webpage title</h1>
        <!-- A paragraph -->
        <p>
            This is a paragraph with a link to a
            <!-- A link -->
            <a href="contact.html">contact</a>
            form page.
        </p>
        <!-- this is a comment -->
    </body>
</html>
As you can see, the content of a webpage lives in the <body> and each HTML element begins with an opening tag <tag> and ends with a closing one </tag>.
Nota bene: Some elements, Void elements, don't have a closing tag.
Now, imagine a webpage with a lot of content.
Imagine how the structure would be huge, crowded and difficult to write...
If you can't visualize it, visit the original post, right-click anywhere on the page then click on View Page Source and see for yourself...
This is where Markdown comes in!
Markdown allows you to write using an easy-to-read, easy-to-write plain text format, then convert it to structurally valid XHTML (or HTML).
So instead of writing a complex structure, we just use plain text!
How amazing is that?!
And this is why Markdown is gaining popularity among developers.
There are many editors, online and offline, to use Markdown.
In our case, a Node.js application that converts a Markdown file contents into data for a blog, we'll need the following:
A Node.js version greater than 18.x
A code editor with Markdown support like VS Code, VS Codium or Sublime Text...
To write in Markdown in one of those editors, simply create a file ending with the .md extension.
Let's create on the computer's desktop a folder named node-markdown-blog.
Open this folder in your code editor and create a file named from-markdown-to-html.md.
Copy and paste the following code into this file and save:
---
title: From Markdown to HTML in Node.js
description: A post about converting the contents of a Markdown file to HTML in a Node.js application
date: 2023-08-31
tags: [Node.js, Markdown, HTML]
---

## Intro

To read the content of a Markdown file in Node.js,<br />
we need an interpreter that understands Markdown,<br />
and can convert what he understood to HTML.<br />
So what we need is just like a translator,<br />
who can translate a context from one language to another.

## The translator

There are many [Markdown to HTML translators](https://github.com/markdown/markdown.github.com/wiki/Implementations) out there.<br />
Since we're building a Node.js app, we need a translator that works in this environnement.<br />
We'll be using, the best one in my humble opinion for this task,<br />
[Marked](https://github.com/markedjs/marked), a markdown parser and compiler.

## Installation

To install Marked in a Node.js application,<br />
type the following command in the terminal of your code editor:

```bash
npm install marked
```

You now have a powerful Markdown converter at your service 😉

## Usage

To start using Marked, all we have to do is to fill its `parse()` method with some Markdown.<br />
It's as simple as the following block of code:

```js
import { marked } from 'marked'
const html = marked.parse('# An H1 heading converted from Markdown to HTML with Marked!')
```

The output of the code above would be:

```html
<h1>An H1 heading converted from Markdown to HTML with Marked!</h1>
```

That's all folks, CU!
If you're using VS Code, like me, press Ctrl + K then press V, abracadabra!
You can now see a preview of the Markdown file.
If you look closer, the block that is delimited by a pair of 3 hyphens --- is not being rendered.
That's because it's a YAML front matter and doesn't get parsed by a Markdown parser.
A front matter holds data in a Markdown file.
We will see later how they will be used.
Converting Markdown to HTML
We have seen how to display a preview of a Markdown file, Let's now use Marked to get the HTML out of it.
First things first, we have to initialize our Node.js project.
Type the following command in the terminal:
npm init -y
This will create a package.json file in the project:
{
  "name": "markdown-blog",
  "version": "1.0.0",
  "description": "",
  "main": "index.js",
  "scripts": {
    "test": "echo \"Error: no test specified\" && exit 1"
  },
  "keywords": [],
  "author": "",
  "license": "ISC"
}
This file will hold all the information about our application, its scripts and dependencies.
Now install Marked with the following command:
npm install marked
If you have read the content of our Markdown file, you now know that we need to use the parse() method of Marked to get its corresponding HTML.
To get there, we first have to instruct our application to read the content of the file and then to convert it to HTML with Marked.
The file system in Node.js allows us to interact with files.
The only synchronous line that we will use in our code is the readFileSync() method of the fs module.
The readFileSync() method returns the contents of a defined path, a file in our system, and this is exactly what we are looking for.
Create a file named index.js, this will be the main file of our application, also called the server file.
If you look at package.json above, you'll see that there is a main property with a value of index.js.
Now you should remember that a Markdown parser doesn't parse a front matter, like we mentioned previously, so we must write a function that will do this job and make its data accessible.
In index.js paste the following function:
function parseFrontMatter(text, delimiter = "---") {
    const lines = text.split("\n")
    const frontmatter = {}

    let i = 0
    if (!lines[i].startsWith(delimiter)) {
        throw new Error("Front matter delimiter not found.")
    }

    i++
    while (i < lines.length && !lines[i].startsWith(delimiter)) {
        const line = lines[i].trim()
        const separatorIndex = line.indexOf(":")
        if (separatorIndex === -1) {
            throw new Error(`Invalid front matter syntax: ${line}`)
        }
        const key = line.slice(0, separatorIndex).trim()
        let value = line.slice(separatorIndex + 1).trim()

        // Check if value is wrapped in brackets
        if (value.startsWith("[") && value.endsWith("]")) {
            // Remove brackets and split into array elements
            const trimmedValue = value.slice(1, -1).trim()
            if (trimmedValue.length > 0) {
                value = trimmedValue.split(",").map((item) => item.trim())
            } else {
                value = []
            }
        }

        frontmatter[key] = value
        i++
    }

    if (i === lines.length) {
        throw new Error("End of front matter not found.")
    }

    const content = lines.slice(i + 1).join("\n")

    return {
        frontmatter,
        content,
    }
}
This function extracts front matter from a text and returns it as an object named frontmatter, along with the remaining content after the front matter.
It verifies that the text begins with a front matter delimited by a pair of 3 hyphens --- and that each property and value in the front matter are separated by a colon :.
It also checks for any value in the front matter wrapped in square brackets [ ]. If so, it removes the brackets and splits the value by commas, creating an array of values, like the tags property in from-markdown-to-html.md.
Finally, the function returns a JavaScript object with two properties:
frontmatterwhich is a JavaScript object allowing us to access the front matter datacontentwhich is a string that will be parsed with Marked to get the the correspondingHTML
Just before jumping to the code, we must add a line to package.json to use import statements instead of require.
This line will allow us to use ES modules. If you're new to the modules system, you should read this tutorial.
Open package.json and add the following line "type": "module" just under "main": "index.js", don't forget to add a coma at the end of each line and save Ctrl + S.
Now that everything is in place, let's begin!
In index.js, under the parseFrontMatter() function, import the readFileSync() method from the fs module to read the contents of our Markdown file then use the newly created function on the contents:
function parseFrontMatter(text, delimiter = "---") {
... // Code inside the function
}

import { readFileSync } from "node:fs"

const contents = readFileSync("from-markdown-to-html.md", "utf-8")
const data = parseFrontMatter(contents)
If we debug the code by setting a break point in front of the data constant then Step Over it, we'll get the following output in the debug panel:
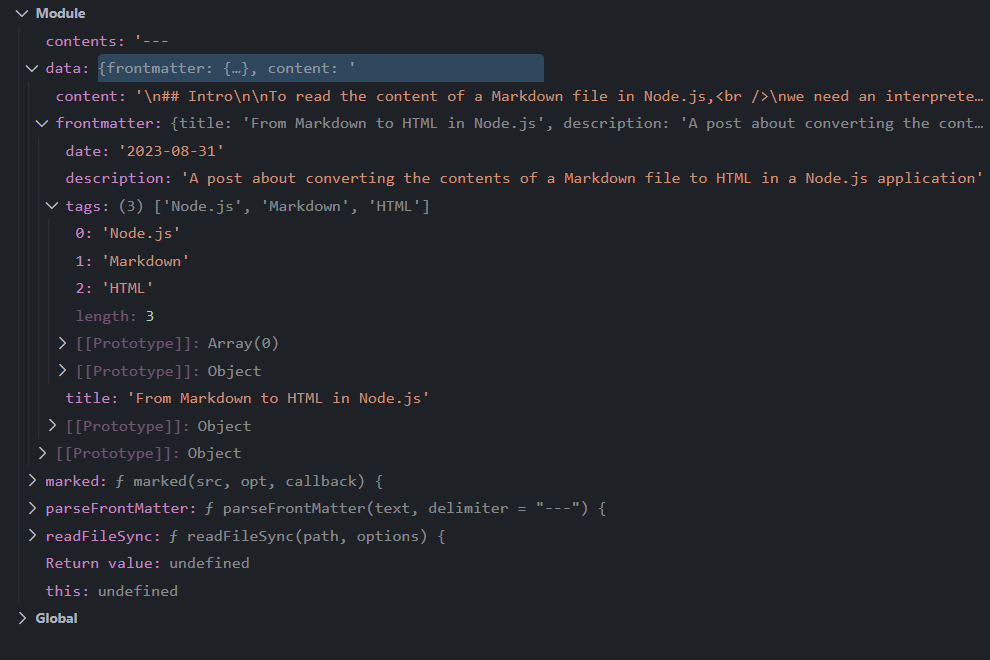
As you can see, the returned variable, data, is an accessible object in which we have:
The
contentof our Markdown file as a stringIts
frontmatteras an object with:The
dateThe
descriptionThe
tagsas an array
This is just awesome! The most difficult and critical part of our application is done!
Concerning the debugging part, VS Code has also a Node.js debugging documentation.
Back to the code, we are one step away from turning the content of the Markdown file to HTML.
Always in index.js, we'll now import Marked to use its parse() method to finally get the HTML out of our Markdown file.
Update the code like so:
function parseFrontMatter(text, delimiter = "---") {
... // Code inside the function
}

import { readFileSync } from "node:fs"
import { marked } from "marked"

const contents = readFileSync("from-markdown-to-html.md", "utf-8")
const data = parseFrontMatter(contents)
const html = marked.parse(data.content) // Accessing data content with dot notation.
Since data is an object, we can access its properties with the dot notation or bracket notation.
Now, if you add a break point in front of the html constant and run the debugger by hitting on F5 then step over it, You'll notice that the html variable in the debug panel displays the returned HTML from the content of the Markdown file 🥳
Using Hono and Eta
Having all the ingredients at our disposal, it's now time to cook and serve!
To give our blog a nice design, download the free Bootstrap blog template DevBlog.
Once downloaded and extracted, open the folder devblog-bs5-v3.0 in your code editor.
Depending on your code editor, you can use an extension to launch a local server and display the template in your default browser.
If you're using VS Code, you can use Live Server or Live Preview if you prefer to display the code in the workspace.
Or, you can simply browse the template's live demo.
Looking at the demo, locally or on the web, you can see that it has 3 pages:
Blog Home to display the latest posts, corresponding to index.html
Blog Post to display a single post, corresponding to blog-post.html
About Me to display a single page, corresponding to about.html
Open the 3 files in your code editor and have a quick look at each page structure.
You'll notice that they share almost the same <head>, blog-post.html has an additional line, and their <body> have the same <header> and the content of each page is wrapped inside a <div class="main-wrapper"> which holds the same <footer>.
Now our goal is to write some files in Markdown and render:
A list of the latest posts on the main route, or home
Each post on a route matching the post's filename
Each page on a route that matches the page's filename
Our backend will use Hono as a web framework and Eta as a template engine.
Back then I used to prefer EJS, nowadays I recommend Eta because it's a faster, more lightweight, and more configurable EJS alternative, without any dependency!
To install Hono and Eta, type the following command in your terminal:
npm install eta hono @hono/node-server
To test our web framework, let's add the following code in index.js under everything else:
... // All previous code

import { serve } from "@hono/node-server"
import { Hono } from "hono"

const app = new Hono()
app.get("/", (c) => c.text("Hono meets Node.js"))

serve(app, ({port}) => {
    console.log(`Listening on http://localhost:${port}`)
})
The code is simple, We have done the following:
Imported Hono and its Node.js adapter
Assigned the framework to a constant named
appDefined a text to be displayed on the entry route
/Served the
appon aportthat is3000by default
Type in the terminal node index and you'll get:
Listening on http://localhost:3000
Visit the link in your browser and you'll see the defined text on the entry route.
To stop the server press Ctrl + C to clear the terminal type clear.
Great! Before going further, we should begin to organize our code because we can't put everything in index.js.
To do so create the following:
A functions folder 📁 that will hold various functions
A routes folder 📁 that will hold the app's routes
A static folder 📁 that will hold the frontend styles, scripts and images
A views folder 📁 where the templates and the Markdown files will be stored
Under the views folder create:
A components folder 📁 for the shared components of the app
A layouts folder 📁 for the different layouts of the app
A pages folder 📁 that will hold the Markdown files of the pages
A posts folder 📁 that will hold the Markdown files of the posts
Move from-markdown-to-html.md inside the posts folder and you should have the following structure in alphabetical order under the main folder node-markdown-blog:
📁 node-markdown-blog
├── 📁 functions
├── 📄 index.js
├── 📁 node_modules
├── 📄 package-lock.json
├── 📄 package.json
├── 📁 routes
├── 📁 static
└── 📂 views
  ├── 📁 components
  ├── 📁 layouts
  ├── 📁 pages
  ├── 📂 posts
  │  └── 📄 from-markdown-to-html.md
The blog
As we have seen previously, the main route /, also known as the entry route or the home route, displays the most recent posts.
Let's begin by creating the shared components, then we'll move on to the layout of the main route or the blog.
We know that we have a common <head>, <header> and <footer>.
Create in the components folder 3 files:
head.html
header.html
footer.html
Copy inside each file the corresponding code:
<head>
    <title>Home | Markdown-based blog</title>

    <!-- Meta -->
    <meta charset="utf-8" />
    <meta http-equiv="X-UA-Compatible" content="IE=edge" />
    <meta name="viewport" content="width=device-width, initial-scale=1.0" />
    <meta name="description" content="List of the most recent posts" />
    <link rel="shortcut icon" href="/static/img/favicon.ico" />

    <!-- FontAwesome JS-->
    <script defer src="https://cdn.jsdelivr.net/npm/@fortawesome/fontawesome-free@6.4.2/js/all.min.js"></script>

    <!-- Theme CSS -->
    <link id="theme-style" rel="stylesheet" href="/static/css/theme-1.css" />
</head>
<header class="header text-center">
    <h1 class="blog-name pt-lg-4 mb-0"><a class="no-text-decoration" href="/">My Markdown Blog</a></h1>

    <nav class="navbar navbar-expand-lg navbar-dark">
        <button
            class="navbar-toggler"
            type="button"
            data-bs-toggle="collapse"
            data-bs-target="#navigation"
            aria-controls="navigation"
            aria-expanded="false"
            aria-label="Toggle navigation"
        >
            <span class="navbar-toggler-icon"></span>
        </button>

        <div id="navigation" class="collapse navbar-collapse flex-column">
            <div class="profile-section pt-3 pt-lg-0">
                <img class="profile-image mb-3 rounded-circle mx-auto" src="/static/images/profile.png" alt="image" />

                <div class="bio mb-3">
                    Hi, this is my Markdown blog. It's a Node.js app that I have created using Eta, Hono and Marked. You
                    can read more about the original application in the following link.
                    <br />
                    <a href="https://github.com/LebCit/blog-doc" target="_blank">Find out more about Blog-Doc</a>
                </div>
                <!--//bio-->
                <ul class="social-list list-inline py-3 mx-auto">
                    <li class="list-inline-item">
                        <a href="#"><i class="fab fa-twitter fa-fw"></i></a>
                    </li>
                    <li class="list-inline-item">
                        <a href="#"><i class="fab fa-linkedin-in fa-fw"></i></a>
                    </li>
                    <li class="list-inline-item">
                        <a href="#"><i class="fab fa-github-alt fa-fw"></i></a>
                    </li>
                    <li class="list-inline-item">
                        <a href="#"><i class="fab fa-stack-overflow fa-fw"></i></a>
                    </li>
                    <li class="list-inline-item">
                        <a href="#"><i class="fab fa-codepen fa-fw"></i></a>
                    </li>
                </ul>
                <!--//social-list-->
                <hr />
            </div>
            <!--//profile-section-->

            <ul class="navbar-nav flex-column text-start">
                <li class="nav-item">
                    <a class="nav-link active" href="/">
                        <i class="fas fa-home fa-fw me-2"></i>
                        Blog Home
                        <span class="sr-only">(current)</span>
                    </a>
                </li>
                <li class="nav-item">
                    <a class="nav-link" href="blog-post.html">
                        <i class="fas fa-bookmark fa-fw me-2"></i>
                        Blog Post
                    </a>
                </li>
                <li class="nav-item">
                    <a class="nav-link" href="about.html">
                        <i class="fas fa-user fa-fw me-2"></i>
                        About Me
                    </a>
                </li>
            </ul>

            <div class="my-2 my-md-3">
                <a class="btn btn-primary" href="https://themes.3rdwavemedia.com/" target="_blank">Get in Touch</a>
            </div>
        </div>
    </nav>
</header>
<footer class="footer text-center py-2 theme-bg-dark">
    <!--/* This template is free as long as you keep the footer attribution link. If you'd like to use the template without the attribution link, you can buy the commercial license via our website: themes.3rdwavemedia.com Thank you for your support. :) */-->
    <small class="copyright">
        Designed with
        <span class="sr-only">love</span>
        <i class="fas fa-heart" style="color: #fb866a"></i>
        by
        <a href="https://themes.3rdwavemedia.com" target="_blank">Xiaoying Riley</a>
        for developers
        <!-- You can remove or modify the following line, including this comment, but everything before must stay in place. -->
        <br />
        Node.js App developed by
        <a href="https://lebcit.github.io/" target="_blank">LebCit</a>
    </small>
</footer>
We have slightly modified the original code of the three components. The important part to notice is that we have replaced assets/ by /static/ since this folder will serve the frontend's static assets.
Please note that in head.html, I've kept the default theme:
<!-- Theme CSS -->
<link id="theme-style" rel="stylesheet" href="/static/css/theme-1.css" />
Create inside the static folder a css folder, then copy inside it the theme-1.css file from devblog-bs5-v3.0/assets/css/.
Nota bene: You can of course choose anyone of the eight available color schemes that you like, but keep in mind that you'll have to replace the theme number according to your choice and import the corresponding file!
Our principal components are ready, we can attack the layout of the blog.
The blog is made of 2 blocks each one inside a <section> tag.
The first section is a call to action displaying the blog title, its description, a welcome message and a subscription form.
The second section displays the latest posts with a navigation at their bottom to visit previous posts.
To keep this tutorial as simple as possible, and since our goal is to create a simple Markdown-based blog with Node.js, I won't implement the subscription form or the posts' navigation.
Inside the layouts folder, create a base.html file and paste the following code inside it:
<!DOCTYPE html>
<html lang="en">
    <!-- Include the content of head.html file here -->
    <%~ include('../components/head.html', it) %>
    <body>
        <!-- Include the content of header.html file here -->
        <%~ include('../components/header.html') %>
        <div class="main-wrapper">
            <!-- Here we open the if...else statement @see https://javascript.info/ifelse -->
            <% if (it.mainRoute) { %>
            <!-- If we are on the main route, the route that displays the list of posts -->

            <!-- BEGINNING OF THE BLOG'S STRUCTURE -->

            <!-- Start blog's intro -->
            <section class="cta-section theme-bg-light py-5">
                <div class="container text-center single-col-max-width">
                    <h2 class="heading">Markdown-based blog - A Markdown Blog Made With Node.js</h2>
                    <div class="intro">Welcome to my blog. Hope that you'll find useful information in my posts.</div>
                </div>
            </section>
            <!-- End blog's intro -->

            <!-- Start blog's posts' list -->
            <section class="blog-list px-3 py-5 p-md-5">
                <div class="container single-col-max-width">
                    <!-- Include the content of index.html file here -->
                    <%~ include('./index.html', it) %>
                </div>
            </section>
            <!-- End blog's posts' list -->

            <!-- ENDING OF THE BLOG'S STRUCTURE -->

            <% } else { %>
            <!-- Else we are not on the main route, we are on a route that displays a Markdown file -->

            <!-- Start Markdown file content -->

            <!-- Include the content of markdown.html file here -->
            <%~ include('./markdown.html', it) %>

            <!-- End Markdown file content -->

            <% } %>
            <!-- Here we close the if...else statement @see https://javascript.info/ifelse -->

            <!-- Start footer -->

            <!-- Include the content of footer.html file here -->
            <%~ include('../components/footer.html') %>

            <!-- End footer -->
        </div>

        <!-- Bootstrap's JavaScript -->
        <script src="https://cdn.jsdelivr.net/npm/bootstrap@5.3.0/dist/js/bootstrap.bundle.min.js"></script>
    </body>
</html>
Don't be scared by Eta markup, every single step is commented on, It's pretty straightforward if you read it carefully!
If you look closely, we have used plain JavaScript, like the if...else statement, inside an HTML file without a <script> tag. This is one of Eta's powers.
We also have used the include() function of Eta to include a partial in a desired location by indicating its relative path.
Concerning the it variable, it's an object containing the data that we pass on a route to a template, we will see it in action shortly.
Did you notice that we have included 2 templates, index.html and markdown.html, that do not exist?
Go ahead and create them in the layouts folder, the same folder where base.html is located.
For now, the main route / displays a text message as we can read in index.js:
app.get("/", (c) => c.text("Hono meets Node.js"))
Let's dive into the blog transformation.
For that we will need the following:
A function to get the Markdown files from their respective directory. The directory could be the pages folder or the posts folder.
A function to get the Markdown data from the Markdown files depending on their directory.
A function that returns the posts' data and sorts them in chronological order, from the newest to the oldest.
While at it, a function that returns the pages' data.
A route that renders a template to display all the posts.
For simplicity and elegance, I'll wrap those functions with the previous one parseFrontMatter() under a class.
In the functions folder, create a file named node-markdown-blog.js and paste the following code inside it:
import { readFileSync } from "node:fs"
import { readdir } from "node:fs/promises"

class NodeMarkdownBlog {
    // Method to parse front-matter from Markdown files.
    parseFrontMatter(text, delimiter = "---") {
        const lines = text.split("\n")
        const frontmatter = {}

        let i = 0
        if (!lines[i].startsWith(delimiter)) {
            throw new Error("Front matter delimiter not found.")
        }

        i++
        while (i < lines.length && !lines[i].startsWith(delimiter)) {
            const line = lines[i].trim()
            const separatorIndex = line.indexOf(":")
            if (separatorIndex === -1) {
                throw new Error(`Invalid front matter syntax: ${line}`)
            }
            const key = line.slice(0, separatorIndex).trim()
            let value = line.slice(separatorIndex + 1).trim()

            // Check if value is wrapped in brackets
            if (value.startsWith("[") && value.endsWith("]")) {
                // Remove brackets and split into array elements
                const trimmedValue = value.slice(1, -1).trim()
                if (trimmedValue.length > 0) {
                    value = trimmedValue.split(",").map((item) => item.trim())
                } else {
                    value = []
                }
            }

            frontmatter[key] = value
            i++
        }

        if (i === lines.length) {
            throw new Error("End of front matter not found.")
        }

        const content = lines.slice(i + 1).join("\n")

        return {
            frontmatter,
            content,
        }
    }

    // Method to get files from their directory recursively.
    async getFiles(dirName) {
        let files = []
        const items = await readdir(dirName, { withFileTypes: true })

        try {
            for (const item of items) {
                if (item.isDirectory()) {
                    files = [...files, ...(await getFiles(`${dirName}/${item.name}`))]
                } else {
                    files.push(`${dirName}/${item.name}`)
                }
            }
        } catch (error) {
            console.error(error)
        }

        return files
    }

    // Method to get the pages and posts data.
    async getMarkdownData(dirname) {
        const files = await getFiles(dirname)
        const mdFiles = files.filter((file) => file.endsWith(".md"))
        const data = []

        mdFiles.forEach((file) => {
            const fileName = file.split("/").pop()
            const contents = readFileSync(file, "utf-8")
            const fileData = parseFrontMatter(contents)
            const filePath = `${dirname}/${fileName}`
            const fileDir = filePath.split("/")[1]
            const obj = { 0: fileName, 1: fileData }
            obj.path = filePath
            obj.dir = fileDir
            data.push(obj)
        })

        return data
    }

    // Method to get the pages data.
    getPages() {
        const pagesData = getMarkdownData("views/pages")
        return pagesData
    }

    // Method to get the posts data.
    async getPosts() {
        const postsData = await getMarkdownData("views/posts")
        const newPostsData = postsData
            .map((obj) => {
                return { ...obj, date: new Date(obj[1].frontmatter.date) }
            })
            .sort((objA, objB) => Number(objB.date) - Number(objA.date))

        return newPostsData
    }
}

export const { parseFrontMatter, getFiles, getMarkdownData, getPages, getPosts } = new NodeMarkdownBlog()
We have created a class NodeMarkdownBlog() containing the desired functions then export and destructurize it to make its methods directly available outside the file.
You already know how parseFrontMatter() works.
The getFiles() function returns all the files inside a particular folder as an array, we just have to provide the folder's path.
Why having a getMarkdownData() method since we already have parseFrontMatter()?
Simply because we need to know some more information about a Markdown file to render it on the frontend.
The getMarkdownData() method uses the getFiles() and parseFrontMatter() methods to read and parse Markdown files, but it also gives us the file path, its directory and its name then returns all of them as an accessible object, we'll see that in a moment.
Finally, the getPages() and getPosts() methods use getMarkdownData() and return as their names indicate the data of the Markdown files respectively in the pages and posts folders.
Now let's create the logic that will display the available Markdown files inside the posts folder, we only have one for now, and render them on the main route or entry route /.
Create in the routes folder a file named mainRoute.js and add to it the following code:
import { join } from "path"
import { Hono } from "hono"
import { Eta } from "eta"
import { getPosts } from "../functions/node-markdown-blog.js"

const app = new Hono()
const eta = new Eta({ views: join(process.cwd(), "views") })

export const mainRoute = app.get("/", async (c) => {
    // Main Route data
    const data = {
        title: "Home",
        description: "List of the most recent posts",
    }

    const res = eta.render("layouts/base.html", {
        // Passing Route data
        mainRoute: true,
        // Passing document data
        data: data,
        posts: await getPosts(),
        // Passing needed settings for the template
        siteTitle: "Markdown-based blog",
    })
    return c.html(res)
})
This block of code begins by importing the necessary modules and initializing an instance of Hono() and another one of Eta().
The eta constant defines the views folder as the one where the templates are located.
The mainRoute constant is exported to be used outside this file. Inside it, a response constant res renders the template located in views/layouts/base.html where some data are passed and can be accessed with the it variable.
Finally, the response constant res is returned as HTML on the defined route /.
Now change the line 2 of head.html, the <title> tag, to:
<title><%= it.data.title %> | <%= it.siteTitle %></title>
Also change the line 8 of head.html, the <meta> description tag, to:
<meta name="description" content="<%= it.data.description %>" />
Those changes will allow us to use the defined title, description and siteTitle for each route. This way, we use only one head that will dynamically assign the correct variables for each document.
Back to base.html where we've defined a template named index.html for the main route and created it in the same folder as base.html, open this index.html file and add the following code:
<% it.posts.forEach(post => { %>
<!-- GETTING THE DATA OF EACH POST -->
<!-- Get the Markdown filename without its extension -->
<% const postFilename = post[0].replace(".md", "") %>
<!-- Get the Markdown post title from its front matter -->
<% const postTitle = post[1].frontmatter.title %>
<!-- Get the post date from its front matter -->
<% const postDate = post[1].frontmatter.date %>
<!-- Get the post description from its front matter -->
<% const postDescription = post[1].frontmatter.description %>
<!-- Get the post tags from its front matter -->
<% const postTags = post[1].frontmatter.tags %>
<div class="item mb-5">
<div class="row g-3 g-xl-0">
<div class="col-2 col-xl-3">
<img class="img-fluid post-thumb" src="assets/images/blog/blog-post-thumb-1.jpg" alt="image" />
</div>
<div class="col">
<h3 class="title mb-1">
<a class="text-link" href="/posts/<%= postFilename %>"><%= postTitle %></a>
</h3>
<div class="meta mb-1">
<span class="date"><%= postDate %></span>
<span>
<!-- Start post tag(s) -->
<% postTags.forEach(tag => { %>
<!-- Start each tag markup -->
<%= tag %>
<!-- End each tag markup -->
<% }) %>
<!-- End post tag(s) -->
</span>
</div>
<div class="intro"><%= postDescription %></div>
<a class="text-link" href="/posts/<%= postFilename %>">Read more →</a>
</div>
</div>
</div>
<% }) %>
Using a forEach() loop, thanks to Eta, we define the markup for each post preview on the homepage.
Now, to see what our homepage looks like, remove everything from index.js and paste the following code:
import { Hono } from "hono"
import { serveStatic } from "@hono/node-server/serve-static"
import { serve } from "@hono/node-server"

const app = new Hono()

// Serve Static files
app.use("/static/*", serveStatic({ root: "./" }))

// Routes
import { mainRoute } from "./routes/mainRoute.js"

app.route("/", mainRoute)

serve(app, ({ port }) => {
    console.log(`Listening on http://localhost:${port}`)
})
Type node index in the terminal and visit the link, abracadabra!
I know that some elements are missing and that the footer is not at the bottom. It's okay, don't worry, we'll fix that later on.
Okay, but you must be asking yourself where those variables defined in index.html came from?!
Do you remember that in mainRoute.js we have passed to the template, in the data object, a posts property with a value of await getPosts() and that in the template we have used a forEach() loop on those posts?
Let's test it. Add to mainRoute.js under the last import the following line:
const test = await getPosts()
Add a breakpoint in front of this line and launch the debugger then step over it. Look at the test variable in the debug panel and you'll see how every post is returned inside an array as an accessible object like this image:
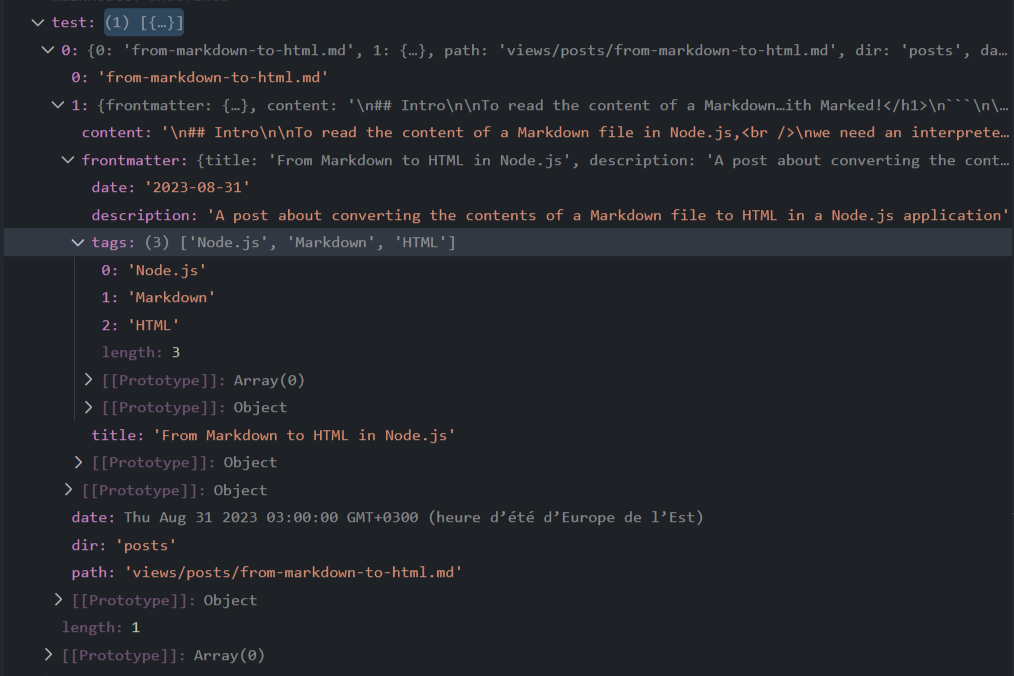
So each post is returned as an object containing:
The post filename with its extension at index 0
An object returned by
parseFrontMatter()at index 1A
dirandpathproperties, directly accessible
Now remove or comment on this added line since we don't need it in the code.
A single blog post, a single page
In this section, we will learn how to render a post and a page on the frontend and we will fix the issues of the previous section regarding the missing elements and the footer's position.
If you look at the structure of blog-post.html in bevblog-bs5-v3.0, you'll see that after the <div class="main-wrapper">, that we already have in base.html, each post is made of:
An
<article>tag followed by a<div class="container ..."in which we have:A post
<header>A
<div class="blog-post-body">A posts navigation
A comments section
A promo
<section>
I will only include the post header and body, the posts' navigation and comments section are outside the scope of this tutorial, feel free to include the promo section by copying its HTML and pasting it after the article closing tag </article>.
With this decision, the about.html file representing a page has now a very close design to the post. I will use the post structure for both of them to keep this tutorial as simple as possible.
For the blog, I started with the template, Usually, we start with the route to pass the variables then we construct the template.
Create a markdownRoute.js in the routes folder and add to it the following code:
import { join } from "path"
import { Hono } from "hono"
import { Eta } from "eta"
import { marked } from "marked"
import { getPages, getPosts } from "../functions/node-markdown-blog.js"

const app = new Hono()
const eta = new Eta({ views: join(process.cwd(), "views") })

export const markdownRoute = app.get("/:folder/:filename", async (c, next) => {
    // Merge the pages and the posts arrays into a single array named mdFiles
    const pages = await getPages()
    const posts = await getPosts()
    const mdFiles = pages.concat(posts)

    const currentFile = mdFiles.find(
        (file) => file.path === `views/${c.req.param("folder")}/${c.req.param("filename")}.md`
    )

    if (currentFile) {
        const fileData = currentFile[1].frontmatter
        const fileContent = marked.parse(currentFile[1].content)
        const fileDirectory = currentFile.dir
        const res = eta.render("layouts/base.html", {
            // Passing Route data
            mdRoute: true,
            // Passing Markdown file data
            data: fileData,
            content: fileContent,
            dirname: fileDirectory,
            // Passing needed settings for the template
            siteTitle: "Markdown-based blog",
        })
        return c.html(res)
    } else {
        // Proceed to the 404 route if no file is found
        await next()
    }
})
Here we did the following:
Initialize Hono and Eta like previously. Import Marked, the pages and the posts
Export a
markdownRouteconstant to be used outside this fileDefine a dynamic path
"/:folder/:filename"that will look for a filename in a folderMerge the pages and posts in a
mdFilesarrayThe
currentFilelooks for an existing file matching the folder (pages or posts) and the filenameIf the file exists, we pass the desired variables inside the template and return its
HTMLOtherwise, the
404 Not Foundmessage will be displayed
For this route to work on the frontend, we must call it inside the server file index.js like so:
// Add this line under: import { mainRoute }...
import { markdownRoute } from "./routes/markdownRoute.js"

// Add this line under: app.route("/", mainRoute)
app.route("/", markdownRoute)
To attach an image to a Markdown file, just add an image property to the file's front matter.
We can also add an imageAlt (alternative text) and imageCredit properties.
It's always good to give credit where credit is due!
Download the medium size of the following image from Unsplash and save it inside the /static/img/ folder of our application.
Let's add those properties to the front matter of our Markdown file like so:
---
title: From Markdown to HTML in Node.js
description: A post about converting the contents of a Markdown file to HTML in a Node.js application
date: 2023-08-31
tags: [Node.js, Markdown, HTML]
image: /static/img/pankaj-patel-Fi-GJaLRGKc-unsplash.jpg
imageAlt: JavaScript code inside ES6 templates by Pankaj Patel
imageCredit: https://unsplash.com/@pankajpatel
---
You can, of course, put the direct link to an image instead of downloading it and saving it in the img folder.
As an example, we could have put in front of the image property the following link:
image: https://source.unsplash.com/Fi-GJaLRGKc
The template that renders Markdown files in our application is markdown.html, Open it and paste the following code:
<article class="blog-post px-3 py-5 p-md-5">
    <div class="container single-col-max-width">
        <header class="blog-post-header">
            <h2 class="title mb-2"><%= it.data.title %></h2>
            <h3><%= it.data.description %></h3>
            <% if (it.dirname === "posts") { %>
            <div class="meta mb-3">
                <span class="date"><%= it.data.date %></span>
                <span>
                    <!-- Start post tag(s) -->
                    <% it.data.tags.forEach(tag => { %>
                    <!-- Start each tag markup -->
                    <%= tag %>
                    <!-- End each tag markup -->
                    <% }) %>
                    <!-- End post tag(s) -->
                </span>
            </div>
            <% } %>
        </header>

        <div class="blog-post-body">
            <!-- Markdown file image -->
            <figure class="blog-banner">
                <a href="<%= it.data.imageCredit %>" target="_blank">
                    <img class="img-fluid" src="<%= it.data.image %>" alt="<%= it.data.imageAlt %>" />
                </a>
                <figcaption class="mt-2 text-center image-caption">
                    Image Credit:
                    <a class="theme-link" href="<%= it.data.imageCredit %>" target="_blank"><%= it.data.imageAlt %></a>
                </figcaption>
            </figure>

            <!-- Markdown file content -->
            <%~ it.content %>
        </div>
    </div>
</article>
Look closely at the <header>, the date and tags will only be displayed if the file's directory is posts.
In other words, if the file is a post display the date and tags otherwise don't, and that's because a page doesn't usually have those properties in its front matter.
Type node index in the terminal, follow the link and click on the link of our only article or its Read more → button, abracadara!
Now, let's fix the image of the post preview on the blog.
For this, add the following variables under the existing ones in index.html:
<!-- Get the post image from its front matter -->
<% const postImage = post[1].frontmatter.image %>

<!-- Get the post image alternative text from its front matter -->
<% const postImageAlt = post[1].frontmatter.imageAlt %>
One more adjustment and our blog will render the image of a post.
Always in index.html make the following modification:
<!-- Replace this line -->
<img class="img-fluid post-thumb" src="assets/images/blog/blog-post-thumb-1.jpg" alt="image" />
<!-- By the following line -->
<img class="img-fluid post-thumb" src="<%= postImage %>" alt="<%= postImageAlt %>" />
If the server is still running, restart it by pressing Ctrl + C then type node index in the terminal.
The defined image of a post is now correctly displayed in the post's preview on the blog.
To fix the footer's position on the blog, you must add at least two more posts to the blog, I'll leave this exercise to you so you can familiarize yourself with the process of creating a blog post.
Concerning the profile image in header.html, you can download any image that suits your needs into the img folder and replace profile.png with the filename of the downloaded one.
Don't forget to modify in header.html the social media icons and links to yours. Also, change the menu titles and links in header.html according to your needs.
Finally, the process of creating a page is the same as creating a post. The only difference is that the page's front matter doesn't have a date or tags properties.
As an example, the following front matter for a page:
---
title: The title of the page
description: The description of the page's contents
image: The path or URL to the page's image
imageAlt: The alternative text of the image
imageCredit: The link to the image or its author
---
Blog-Doc
This tutorial is a simplified approach to how the blog, the pages and the posts are rendered on the frontend in Blog-Doc: The simplest Node.js CMS and SSG!
Blog-Doc allows you to create a working site without touching a line of code and to choose the look of your site from the available themes.
Soon, the template used for this tutorial will be fully integrated into Blog-Doc as its third theme!
If you have a GitHub account, please consider giving a star to Blog-Doc and also for the GitHub repository of this tutorial where you can ask me anything about it in the Q&A section of the discussions.
I've dedicated one week and a half, from 31 August to 11 September, of my free time to write this long and detailed tutorial.
If you read it on my Hashnode blog and found it useful, please consider liking it and leaving a little comment.
Anyway, thank you for your time and patience, I hope that this tutorial will be useful and instructive in many ways for all its readers.


